
Documentation Index
Fetch the complete documentation index at: https://mainwp-mintlify-c6f1d78c.mintlify.app/llms.txt
Use this file to discover all available pages before exploring further.
What You’ll Learn
- Supported caching plugins and solutions
- Automatically purging cache after updates
- Manually clearing cache from the Dashboard
- Configuring Cloudflare cache integration
Extension Add-on - This add-on provides standalone functionality within MainWP Dashboard. No third-party plugins required.
MainWP Cache Control extension allows you to automatically purge the Cache on your child sites after performing an update of WP Core, Theme, or a Plugin through the MainWP Dashboard. Currently supported caching solutions are
- Cloudflare
- Breeze
- LiteSpeed Cache
- Siteground Optimizer
- Swift Performance Lite and Pro
- WP Fastest Cache
- W3 Total Cache
- WP Rocket
- AccelerateWP
- Hummingbird Performance
- Cache Enabler
- Nitropack
- Autoptimize
- Nginx Helper
- WP Optimize
- Comet Cache
- FlyingPress
- WP Super Cache
- Rocket.net
- Pressable Cache Management
- RunCloud Hub

Manually clear cache
The cache will be cleared automatically upon WP Core, Theme, or a Plugin update, but you can also manually trigger the clear.From the Manage Sites table
Cache can be cleared for any number of sites from the Manage Sites page. Select a number of desired sites, or all of them, and then from the Bulk Actions menu, select Clear Cache Control, and then click Apply.
Using widgets
Cache Control widgets are located on the Overview page and the Individual Child Sites Overview pages. Locate them and simply click the Clear Cache button. If you do not see the widget, you may need to enable it from the Page Settings.
Cloudflare cache purging
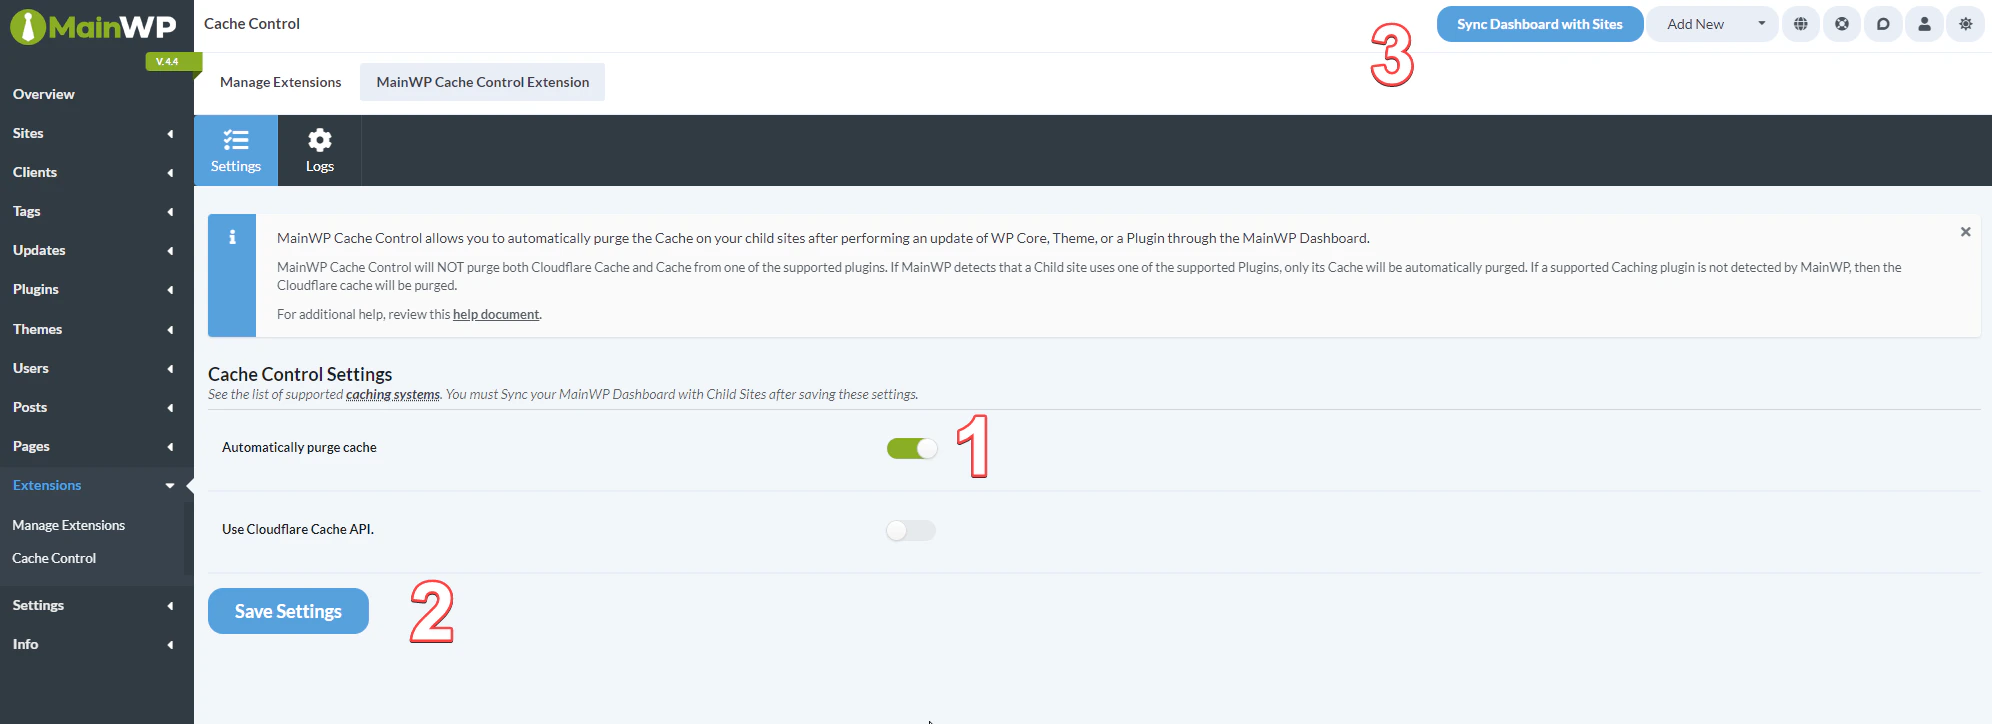
To enable Cloudflare cache purging, turn on the Use Cloudflare Cache API setting and provide valid Cloudflare credentials. NOTE Since version 4.0.1, the Cache Control extension will handle cache purging of both Cloudflare and the supported caching plugin at the same time. Previously, if both caching solutions were present, only the caching plugin was supported.
Choose an authentication method
Cache Control supports two ways to authenticate with Cloudflare. Pick the one that matches how you manage your Cloudflare account:- Global API Key (default) — Authenticates with your Cloudflare account email and Global API Key. Use this if you’ve previously configured Cache Control or rely on the legacy key.
- API Token — Authenticates with a scoped Cloudflare API Token (Bearer Token). Recommended for most accounts because tokens can be limited to specific zones and permissions, and can be revoked individually.
- API Token (recommended)
- Global API Key
- In your Cloudflare dashboard, go to My Profile > API Tokens and create a token with Zone.Cache Purge permission for the zones you want to manage.
- In MainWP, go to Extensions > Cache Control.
- Enable Use Cloudflare Cache API.
- Enable Use Cloudflare Token.
- Paste the token into the Token field and click Save Settings.
Per-site Cloudflare credentials
Each Child Site can override the global Cloudflare credentials, which is useful when different sites are on different Cloudflare accounts.- Go to Sites > Manage Sites, open the Child Site, and click the Cache Control tab.
- Enable Use Cloudflare Cache API to override the global settings.
- Choose the authentication method with the Use Cloudflare Token toggle.
- Enter either the Token or the Cloudflare API Email and API Key, then save.
Change Cache Control settings on All child sites
Change Cache Control settings on a Single Site
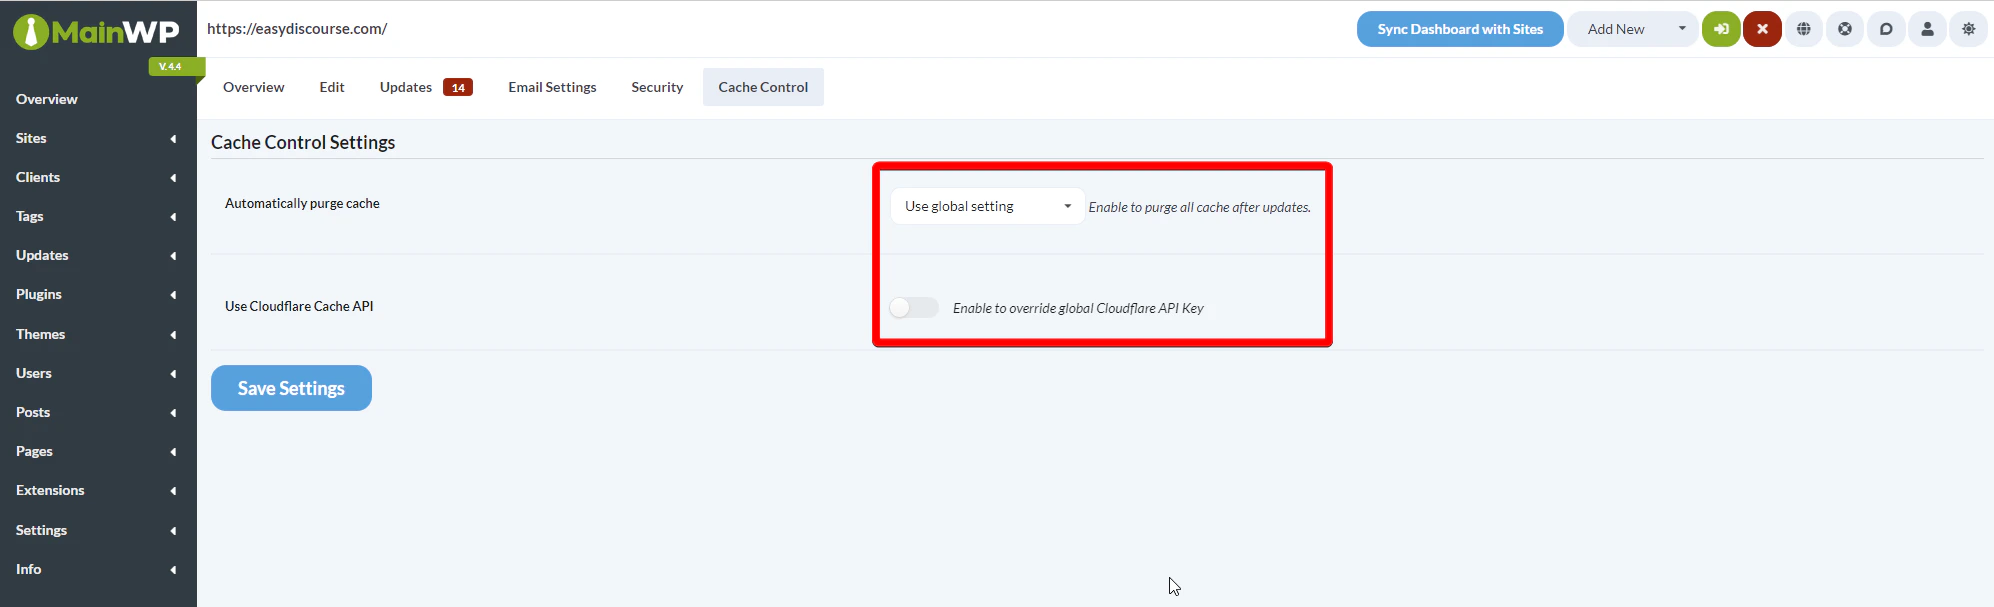
Locate the Child site, open its Dashboard and go Cache Control page
Locate the Child site, open its Dashboard and go Cache Control page
- Override the global settings by selecting Yes or No from the dropdown
- Optionally, enable the Cloudflare Cache API and enable the site-specific API key
Related Resources
- Performance Add-ons - Browse all performance tools
- WP Rocket Extension - Advanced WP Rocket management
- Manage Updates - Update management guide